Showing posts with label paint. Show all posts

Monday, September 5, 2016


    There are many uses for wallpaper beside putting it on walls.  Let's expand our design palette to find others use for wallpaper. What do you do with leftover rolls of wallpaper? As a redesigner, I am always on the lookout for ideas. These are some great and inexpensive ways to use wallpaper!! Keep in mind, you can also buy discontinued wallpaper from any big box retailer.


    • Creative cabinets. Use it for lining a bookcase or hutch. It gives it a unique look and piazza, without spending a lot.

    Centsational Girl


    • Frame it. You can create your own art by using squares of wallpaper. You can use many different wallpaper. So easy to do!!


    • Transform furniture!  This piece of furniture was completely transformed! 
    savvy housekeeping.com


    • Create custom wainscot. What a unique look!!You can use the wallpaper as a starting point for your wall color paint. This will give you a custom look.


    • Covered lampshade. Turn a boring white shade into something spectacular.  Great for kids room.
    networx.com


    How about lining drawers? Wallpapering your cardboard storage boxes? Dressing up you clothes closet? The possibilities can be endless. Just a little imagination and creativity and who knows how far you can go!!


    #AbelllaHomeStaging


    At Abella Home Staging & Redesign, we believe any home can be beautifully transformed. We believe in delivering a custom-made look, but without the custom-made price tag!! Call us and let's get started today!!


    Monday, August 8, 2016

    Why is it so difficult to choose a paint color?

    Why is it so difficult to choose a paint color? As a decorator, I see a lot of clients' homes. More often than not, I hear, "I thought this was the perfect color until I saw it on the wall". So many times the homeowner has chosen a color that does not co-ordinate with their decor. Why is that? Many homeowners will choose a color that they have seen in a magazine. The problem with that, you don't have the same accessories as the magazine picture!! Sometimes they will see a paint color they like at a friend's home. Once again, unless you have a carbon copy of your friend's home, it won't work!!
    So what do you do? Here are some guidelines to help you.
    • Every color has an undertone. Meaning all beige's started as a color, whether it's yellow, red, green, or orange. So pay attention! There are also cool tones and warm tones. Every color has a warm tone and a cool tone. Getting the tone correct is half the battle!! These colors below are all consider beige in color, BUT have different base colors. You won't notice it, until you've painted it on the walls!! 


    • Determine what undertones are in your room. Like your carpet, flooring, counter tops, tiles, and so on. This will have a huge impact on the color choices you make. Here is a great example of how warm colors co-ordinate nicely with one another.


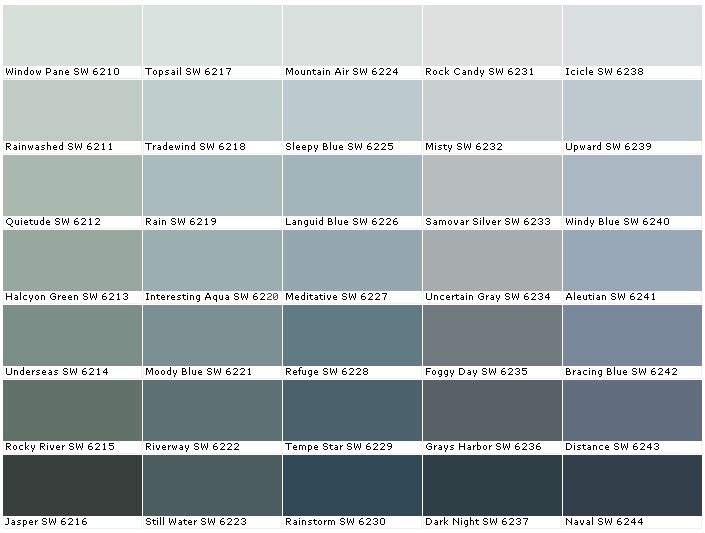
    • Keep all your neutrals the same undertones. By doing this you are assured of having a successful color palette. All the colors below are in the blue-green family. They will work well together.


    • Don't forget lighting. All colors will look different in different lightening situations, like morning sun, afternoon shade, evening lighting, LED, incandescent, and fluorescent. So make sure you test the colors in these situations.


    • Use large paint samples. Many companies like Sherwin Williams offer 8x11 samples that can be ordered online. This is great because you can now truly see the color.


    • NEVER paint the color sample on the wall. The existing color will influence the color swatch and you will not get a true read!!


    These guidelines will help you when choosing your color palette. You can also decide to hire a color specialist. This small investment will assure you that the color you are choosing is the correct one, there-by eliminating any costly mistake. So well-worth the price!!


    #AbellaHomeStaging

    At Abella Home Staging & Redesign, we believe any home can be beautifully transformed. We believe in delivering a custom-made look, but without the custom-made price tag!! Call us and let's get started today!!


    Monday, August 17, 2015

    Up and coming color trends!!

    What is the up and coming color trends? According to Pantone, there are 4 color palettes that are emerging strong. So what are they?


    1. Ephemeral. We are going to see a lot of pastels.  There is a move towards softer colors. The world has become a much more stressful place. People are looking for a way to destress, and color is one way to achieve that. Rooms that are painted in pastels have a quiet, calming, relax effect. Pastels will be seen in just about everything, from fashion, to accessories, to appliances.


    2. Bijou. Think jewel tones, amethyst, violet. Metallic finishes, think sheen, iridescent, pearlized finishes. This is just about finishes and the material being used will have a great impact on the finish. 


    3. Footloose. This is a palette about nature. It's about kicking back, relaxing and bring the garden indoors. Think flower colors, blue, green, yellow, orange, taupes.


    4. Mix Bag. Technology today has made the world a smaller place. Cultures are blending. Think bright bold colors. This isn't just a trend, this is life and it's here to stay. Global eclectic mix. A good global mix is almost unidentifiable. You shouldn't be able to identify the culture.


    What do you think of this up and coming color trend? Can you see yourself doing any of these palettes? Which one is your favorite? One thing for sure, people are being bolder then ever. Gone are the days when you would buy furniture and keep it 20-30 years, like our parents and grandparents did. We have become a disposable generation, which may not be a bad thing when it comes to design and color! It keeps our design young and fresh and I like that!!




    Tuesday, July 28, 2015

    Building & organizing my shed

    Building and organizing my shed was a time consuming project, but well worth the time and effort. I needed a shed to put all my tools and yard items. So, I brought one of those pre-fab shed and had my contractor, New Island Remodeling, put it together. They did a great job as usual!!


    Reading those instruction was time consuming!!


    We're almost there!!


    Construction is done, now the fun begins! A lot of work on my part, but worth it. I painted the inside and the outside. Why you ask? Because it  brightened up the inside, and protects the outdoor against the elements.


    This shed came with two shelves! Very handy, it allowed me to store my tables and outdoor area rug. I added hooks to hang items that were large or bulky.


    I added a peg board and even added a table. This allows me to use it as a small work station


    I labeled all my items. This way when my CHILDREN use the items, they know where to PUT IT BACK!! No excuses!!


    I brought these white storage cubes from Home Depot. They are great because they are plastic. I brought  six of them. They come 2 in a pack.


    I brought these fabric storage bins from Target. They're called Threshold Fabric Cube. They come in different colors. They fit perfectly in those white storage cubes.


    I use PVC tubing and cut them on an angle, then nailed them to wood. This allowed me to store my long items, without taking up space!


    Lastly, I use these hooks to hang my ladders, hose and eventually my snow shovels!!


    It's not done until I add some piazza to it!! Couldn't help myself!!


    Now it's all done. It gives me lots of storage space. I'm very proud of what I accomplished on my own!! But I'm not done yet. I will be adding cement (no I will not do it), sometime in the fall. This way, there won't be such a big step getting in or out of the shed.


    Monday, March 9, 2015

    Revamping your Old Kitchen Cabinets

    Revamping your old kitchen cabinets isn't as difficult as you may think. As a decorator and home stager, I get asked this question a lot, "What can I do to update my kitchen, without spending a lot of money?" There are a few solution that you can do to update your kitchen, without the heavy expense of remodeling.


    The easiest and by far least expensive, is to paint them!


    Add beadboard to flat paneled door. Then paint it.


    Remember these cabinets? Very trendy in the eighties, but so outdated now!! Using 2" wood strip, it completely changed the look of the cabinets!! Loved how they turned out.


    Don't want to spend money on beadboard? Use paintable beadboard wallpaper. Easier to cut, same great effect!!


    Use half-round decorative molding to achieve this look. Then paint it any color you want!!


    As you can see, there are many ways to update the look of your kitchen cabinets, without blowing the budget. Takes a little time, but the results are simply amazing!! And with all the money you just saved, you can splurge on the backsplash or counter, maybe even both!! For more information on these projects, check out Pinterest.


    Tuesday, January 6, 2015

    Refurbishing old and new furniture pieces!!

    Refurbishing old furniture can be a great way to reuse an old piece that would, otherwise end up in the dump. But it's not just old furniture that can be refurbished. You can refurbish new pieces as well, giving them a more custom look!


    As you can see from these pictures, there is a lot you can do.  Whether you paint, change out the hardware, add mirrors, or cut off the legs, all it takes is some imagination and determination. And viola, a whole new look!!