Wednesday, November 12, 2014

Welcome to my Kitchen!

Welcome to my kitchen! In the past 22 years since I've own my home, it has gone through some major transformations. It took 2 years and 4 different phases to complete the look. I though I would share some photos with you to show you my journey, and perhaps to inspire you, on yours!


1992 - The original kitchen!! Ugh! But I saw beyond this disaster.  Mixed-matched cabinets. The boiler was actually in the kitchen (behind the door on the left). As well as the washer!! Don't you just love that light fixture?


Moved in and had to live with what I had for now, but I changed the light fixture and moved the washer  and boiler out of the kitchen.


1998 - Remodeled the kitchen. I had to live with the previous kitchen for 6 years!! But I finally got a new kitchen, with new cabinets, new countertops, and new appliances. Couldn't afford granite countertops or stainless steel appliance, but I was happy with this version of my kitchen.


2011 Time to remodel again!! After living with this kitchen for 13 years, it was time to remodel once again (Phase 1). This time I wanted an "open concept" floor plan. We had to a eliminated a bearing wall. I was adding an Island, but wasn't sure about the size I needed. So I took my blue tape and "drew" an outline of the cabinets on the floor to give me an idea. Looked good!!


What a mess removing the backsplash!


Had to replace the sheetrock when we removed the tiles.


Removed old molding  and replaced it with dentil molding instead. Much better.


Getting new cabinets was too expensive, and refacing was not an options, since I didn't like the materials being used. So I decided to paint my cabinets instead. I hired a company called Stone services


Before the painting company came in to paint my cabinets, I wanted to add wainscoting to my peninsula. (Phase 2)


This way when they came to paint, everything would get the same paint treatment.  As you can see from the picture, I did this before I removed the backsplash.

Everything had to be removed  inside my cabinets for the painting. What a pain that was!! Now you're probably wondering why there is painted sheetrock on my walls. This was Phase 3, so I had to live with the painted backsplash for a year!! 


Ok, almost done. The painting was done on the cabinets and the backsplash was added. I even did a feature accent above where the stove will be installed.


New granite countertop (added before the backsplash)

New stainless steel sink. 


As you can see, the dishwasher is black. And since it still worked well, I didn't want to replace it just yet. The refrigerator and stove were replaced, and that was expensive enough!! 


So I used a product called Soft Metal Film. It's adhesive product and looks just like stainless steel. I paid $28 for this project. Not bad!!


Friends and family didn't even notice it wasn't stainless steel!!


Last project (Phase 4). I wanted to continue the wainscoting on the wall.


Almost there. Last project, choosing the color and painting!


2013- Viola!! All done. I love they way it turned out. It took about 2 years,  and 4 Phases, but it was worth the wait. I also love the fact that it didn't cost me a fortune. When it was all said and done, I figured it cost around $20,000, including some labour cost. Much better then $50,000 plus, it would have cost me if I had gutted it all out!!

If you need help selecting colors, redesigning your home, or staging your property, Abella Home Staging & Redesign can assist you! Contact us and lets get started today! 

Wednesday, October 29, 2014

Space Planning - What you need to know!

Space planning for many, seems complicated and overwhelming. But it doesn't have to be. Careful planning can help you avoid many pitfalls some of my clients fall into. Here are some things that you need to consider when planning your space.

Storage - What are your storage needs? Cabinets for videos? An area for children's toys? A place to file your mail?  Whatever yours needs may be, make sure you plan a storage area to accommodate it.


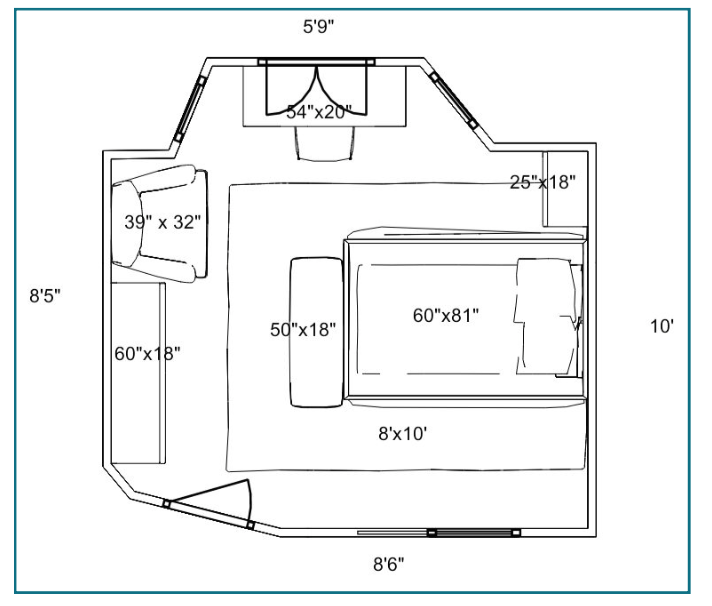
Furniture - Make sure the furniture you choose is appropriate for your space. Too many times I have walked into my clients home, only to see pieces of furniture overpowering the room. My advice? Measure the room BEFORE you go out shopping. Many furniture retailers now have some sort of space planner to help you visualize the space before you purchase the piece. This will also help you realize how many pieces can actually fit into a room!!


Draw - I like to draw my space out on graph paper and include all the pieces I want in the space. This gives me a good idea where everything should go and what size I need. More importantly, 
what I  don't want!!


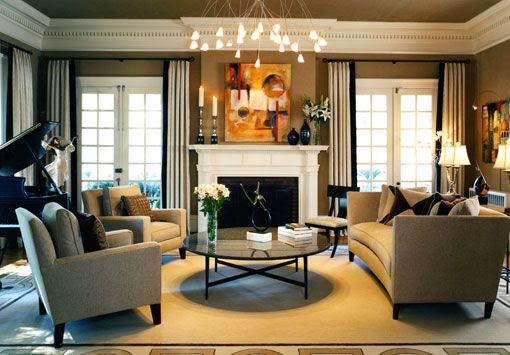
You want to create an illusion of more space. Full length curtains can add height to your room, because it draws the eyes upwards!!


Furniture raised off the floor (that have no skirt) is better than furniture that sits on the floor, for small spaces!


An accent wall will stretch and deepen the space.


Area rugs can be used to indicate a seating area. Make sure you get the right size!!


Ottomans- Use ottomans that have dual purposes and can be move out of the way when needed.


When planning your space, think about traffic flow. Make sure your room is "balanced". I like to use the phrase  "rocking the boat." Does all your furniture sit on one side of the room? These simple suggestions will help you plan your next space. And if you need help, consider hiring an expert. Even a basic room layout can help you avoid costly mistakes!!


Tuesday, October 21, 2014

Window Film, a great alternative to using curtains.


Window films can be a  great alternative to using curtains. It can give you the privacy you want, without having to hang rods. They can be used to control light and enhance interior spaces. They are great when you want to "hide" an unsightly window view, or create privacy on your front door side panels. They come in many different styles and colors, 50 to be exact. Here are just a few samples of window film.

STAINED GLASS


ONE WAY


TRANSPARENT POLYESTER COLOR


OPAQUE


CUT GLASS


PRISM AND DOT PATTERNS


FROSTED


STRIPES AND LINES


 RICE PAPER

Window films provide the advantages of etched, cut, sandblasted, and textured glass, at a fraction of the cost. The beauty of it all,  they can be custom tailored to fit any windows, doors, or even transom. At Abella Home Staging & Redesign, I am always trying to come up with ideas that can help my clients without breaking the bank. This is one idea that I always recommend!!

Monday, September 29, 2014

Today's Modern Window Treatments

Today's Modern Window Treatment are much lighter then they have been in the past. Nowadays, people want to let the light in and see the view. Gone are the days with heavy drapery! Thank goodness. I prefer this modern look, an unobstructed view to the outside!!  That being said, there are so many window treatments to choose from.

Panel System - for sliding doors

Silhouette Blinds- Vertical

Curtains - great alternative for sliding doors, since they can be inexpensive.

Roman Shades -Flat


Roman Shade - Relaxed

Roman Shade - Cascading

Roman Shade - Tulip

Woven wood Blinds - White

Woven Wood Blinds - Natural

Silhouette Blinds - Horizontal  

Honeycomb

Plantation Shutters

Roller Shades

Box-Pleat Cornice

Padded Cornice

 Wooden Cornice

Custom made Cornice - Can be made to any shape and size!

Pinched Pleats with Rings- Makes the curtains easier to slide.

Traditional Pinched Pleats.

Grommets

Rod Pocket Curtains - more difficult for curtains to slide.

Rod Pockets with Rings

So many different styles, fabrics, finishings to choose from. They can add interest, color and texture, to a room. Curtains are an important element to the overall design of the space, so choose wisely!!


Need Help Decorating your space? Call Abella Home Staging & Redsign and lets get started today.